Are you ready to begin our B6169 sew-along? I’m really excited to sew this jacket with you! There are quite a few pattern pieces and steps for this jacket, but the finished jacket will impress you and everyone you know. It looks so professional that it will be worth the effort!

Before we start the sew-along, you’ll need to do the following:
- Pre-wash your fabric. I like to wash almost all fabrics before I begin, and that includes wool. In fact, I hand wash the wool in warm water, line dry it, and then I press the fabric with a lot of steam before I lay it out to cut it. The steam will shrink up the fabric a bit, which will help to stabilize and prevent shrinking of the finished jacket. I learned to do this when I majored in tailoring in school and learned the traditional tailoring methods like pad stitching, etc. Tailors have a giant steaming machine that forces steam through the fabric to help preshrink it. It’s a fantastic tool, but most of us will just need to use a regular iron and ironing board. Which works fine; it just takes a while longer.
- If you’re not sure of your size, I always recommend that you make a muslin to check it. This jacket is loose-fitting enough that it will accommodate a wide range of bust sizes, so if you’re larger than a B cup you may find that you don’t need to do a full bust adjustment for this style. If you do need a little extra room, however, the princess seams can really help with that; you can simply take a smaller seam allowance in the bust area or even add a little extra seam allowance at the bust area before you cut the pieces. Then you can pin the seam line to fit, so no fancy full bust adjustment techniques will be strictly necessary. We’ll call this the cheater full bust adjustment method, OK?
- Once you’ve got your fabric washed, dried, and pressed. You’ll be ready to lay out your fabric and cut it. Then you’ll need to transfer the markings from the pattern pieces to the wrong side of the fabric.
- It’s always a good idea to read through the instructions before you get started.
Also, please note: In this sew-along, I’m going to use a different technique to attach the lining and finish the jacket than the method used in the instructions. The method I’ll use is often called “bagging out” the lining, and it’s used in the industry to streamline the construction process and eliminate a lot of hand sewing. (We’ll still be doing a little bit of hand sewing, but not as much as called for in the instructions.) I’ll also be using a couple of other techniques and some materials that you may not have on hand. Feel free to skip these steps; I included them because I use them when I sew jackets for myself and thought you might enjoy learning them as well.
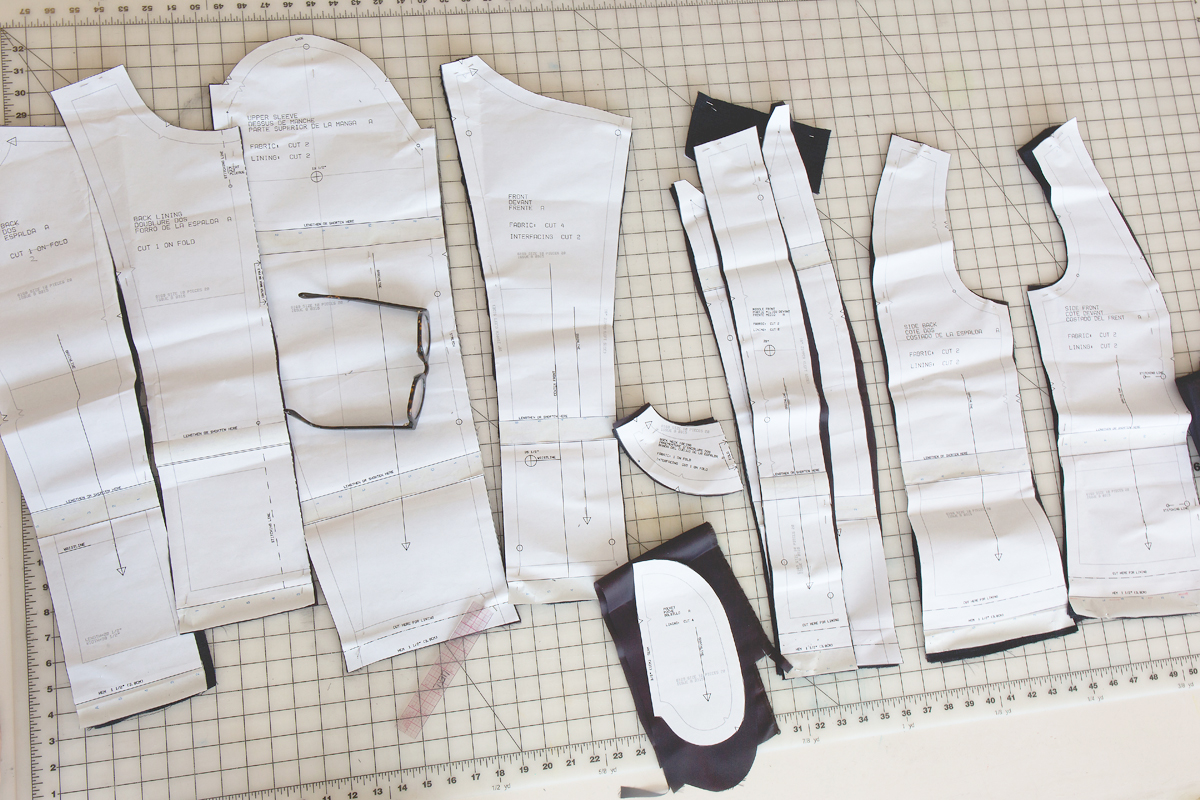
OK? Here are all my pattern pieces, cut out and with the markings transferred, waiting on the cutting table at the studio.
Here’s how I thought we’d structure the sew-along, if you want to plan ahead:
Day 1: Sew the zipper and assemble the center-front panels.
Day 2: Finish assembling the jacket front and jacket back.
Day 3: Assemble and attach the sleeves and add finishing details on the outer jacket. This is where I’ll show you a few special tricks I use which you might find useful.
Day 4: Assemble the lining.
Day 5: Bag out the jacket and finish the jacket. This is where I’ll be diverging from the instructions and will show you another technique with less hand sewing, but feel free to follow the written instructions if you prefer.
Also, a note on the numbered instructions: For most of the numbered steps, I’m following the instructions for the pattern exactly as they’re written. I’ll add my own hints and comments in parenthesis or in a separate paragraph as we go, OK?
Interfacing
For some fabrics, I prefer sew-in interfacing. For the fabric I’m using, which has a slightly open weave, I purchased black featherweight fusible interfacing, but when it arrived it was just too stiff to be used with my fabric. White interfacing would have shown through the weave of the fabric, so I bought very lightweight black woven sew-in interfacing and used that instead. Do whatever feels right to you. If you use sew-in interfacing, instead of fusing in the first step, you’ll baste it to the fabric in the seam allowances to hold it in place.
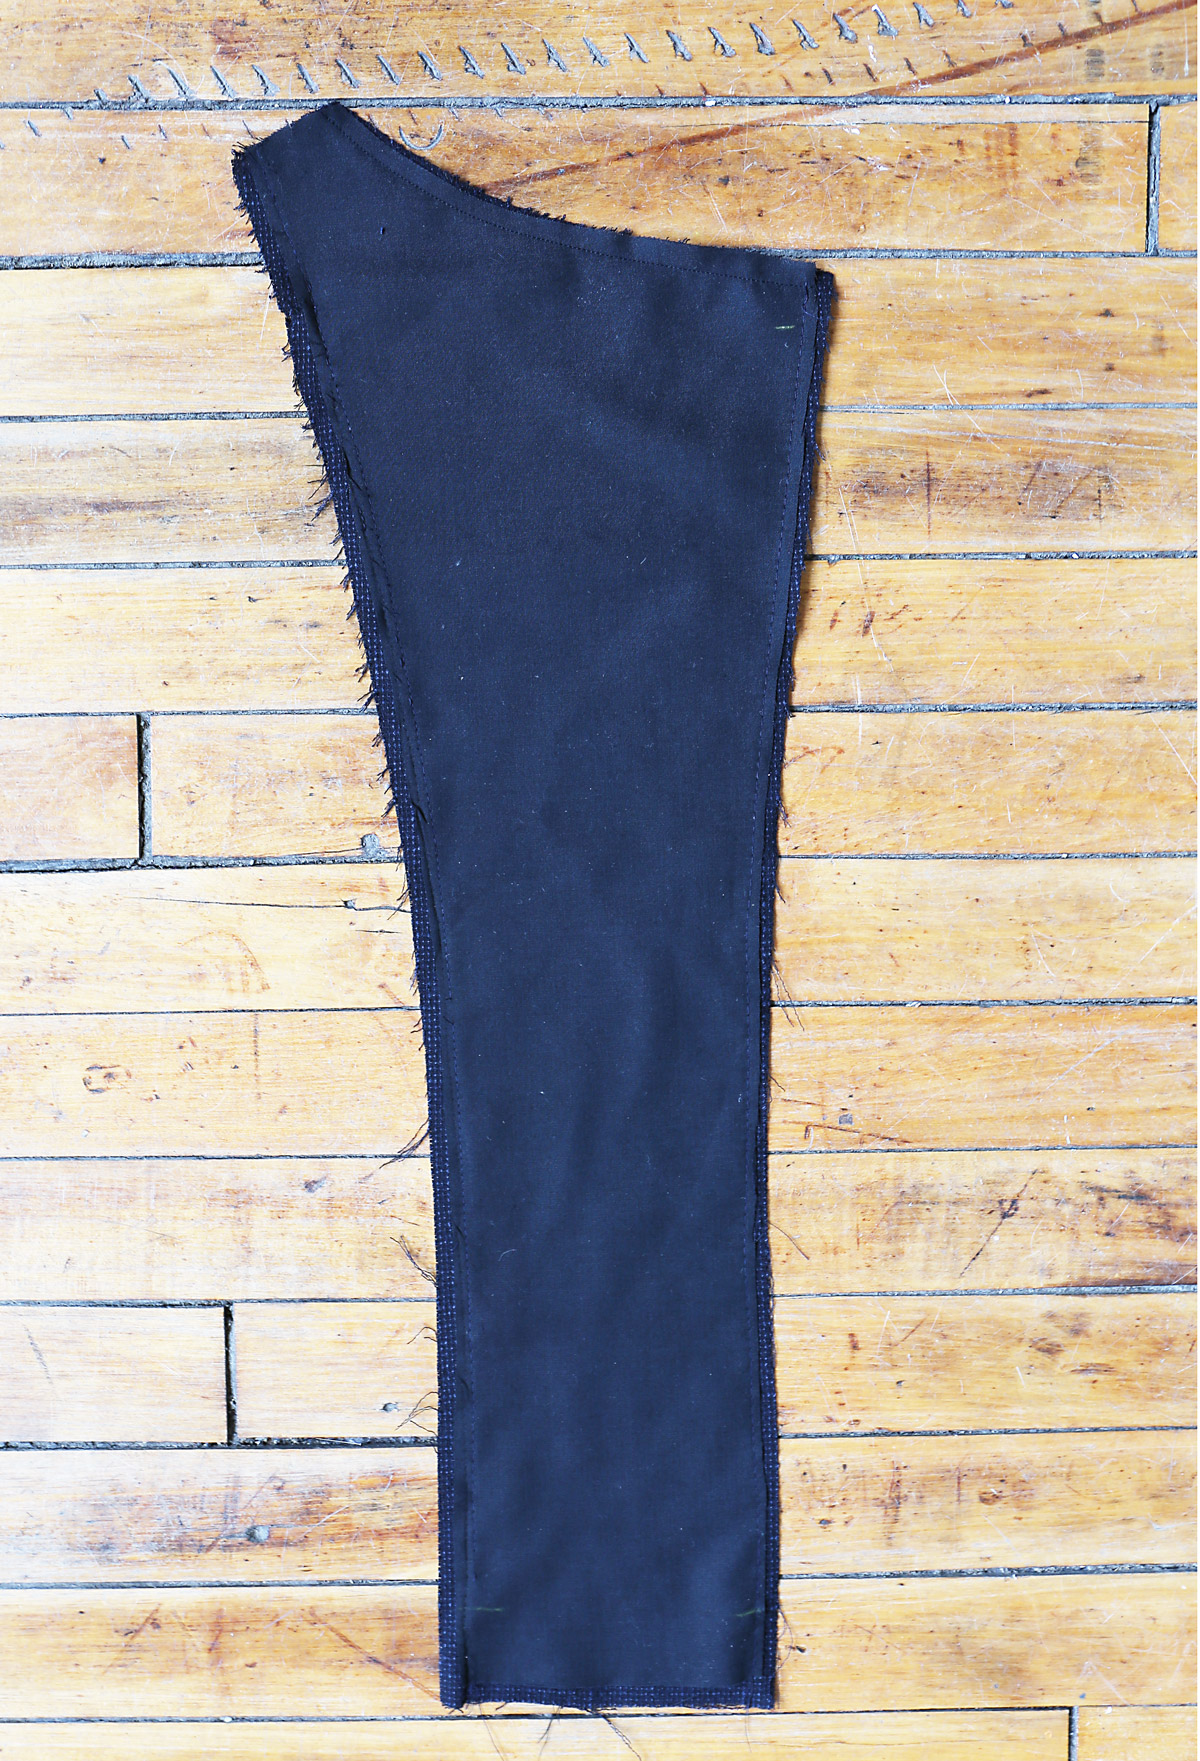
1. Trim corners of INTERFACING, as shown. Fuse interfacing to wrong side of each matching FABRIC section, following manufacturer’s instructions. (For sew-in interfacing, I usually trim a bit of the interfacing from the seam allowances instead of just trimming the corners.)
Front
2. STAYSTITCH side edge of uninterfaced FRONT (1) sections above waist. (Interfaced front sections will be used as facing. Please note that I used the interfaced pieces as my jacket front and the non-interfaced pieces as my facing because I wanted to baste the zippers to a more stable fabric. Either way is ok, but I should point out that I reversed the pieces so you don’t get confused!)
(The staystitching will allow you to safely clip into the seam allowances later.)
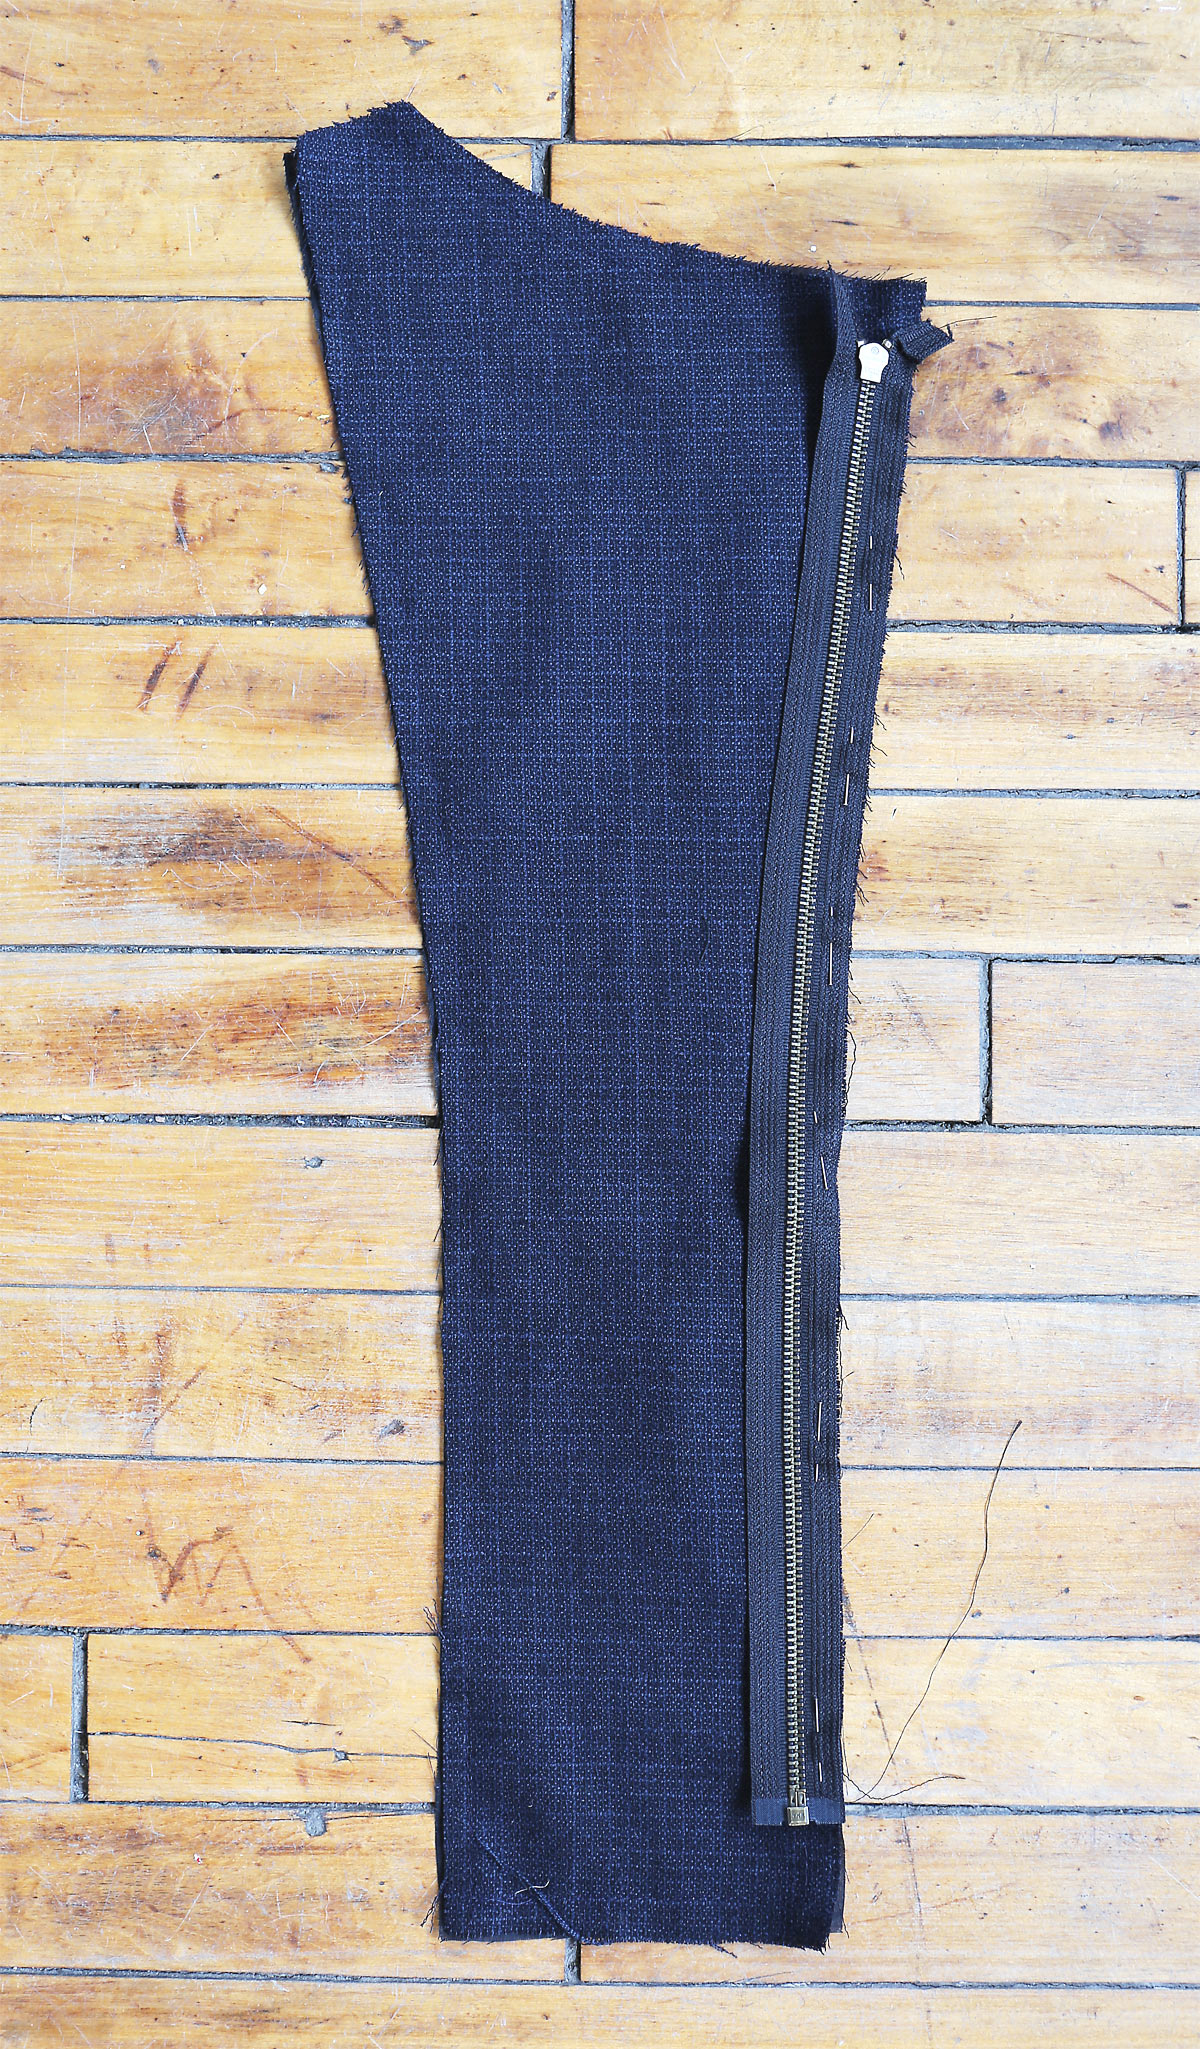
3. On outside, pin closed zipper (face down) to front edge of right front between large circles, placing zipper stop at lower large circle and zipper teeth just over the 5/8” (1.5cm) seam allowance, tapering upper end of zipper tape to nothing at upper large circle. Baste. (You can use a basting stitch or a chalk line to help line up the edge of your zipper with the seam line. I always hand baste the zipper before machine basting or stitching. This helps to prevent stretching the tape and puckering the fabric. It works every time and is worth the extra effort. Then you can just stitch along the side of the zipper with your zipper foot and it’s easy-peasy to sew with no worries. Also, note in the photo below how my zipper tape is angled into the seam allowances at the top of the zipper. This will prevent the zipper upper zipper tape from showing and/or getting in the way later.)
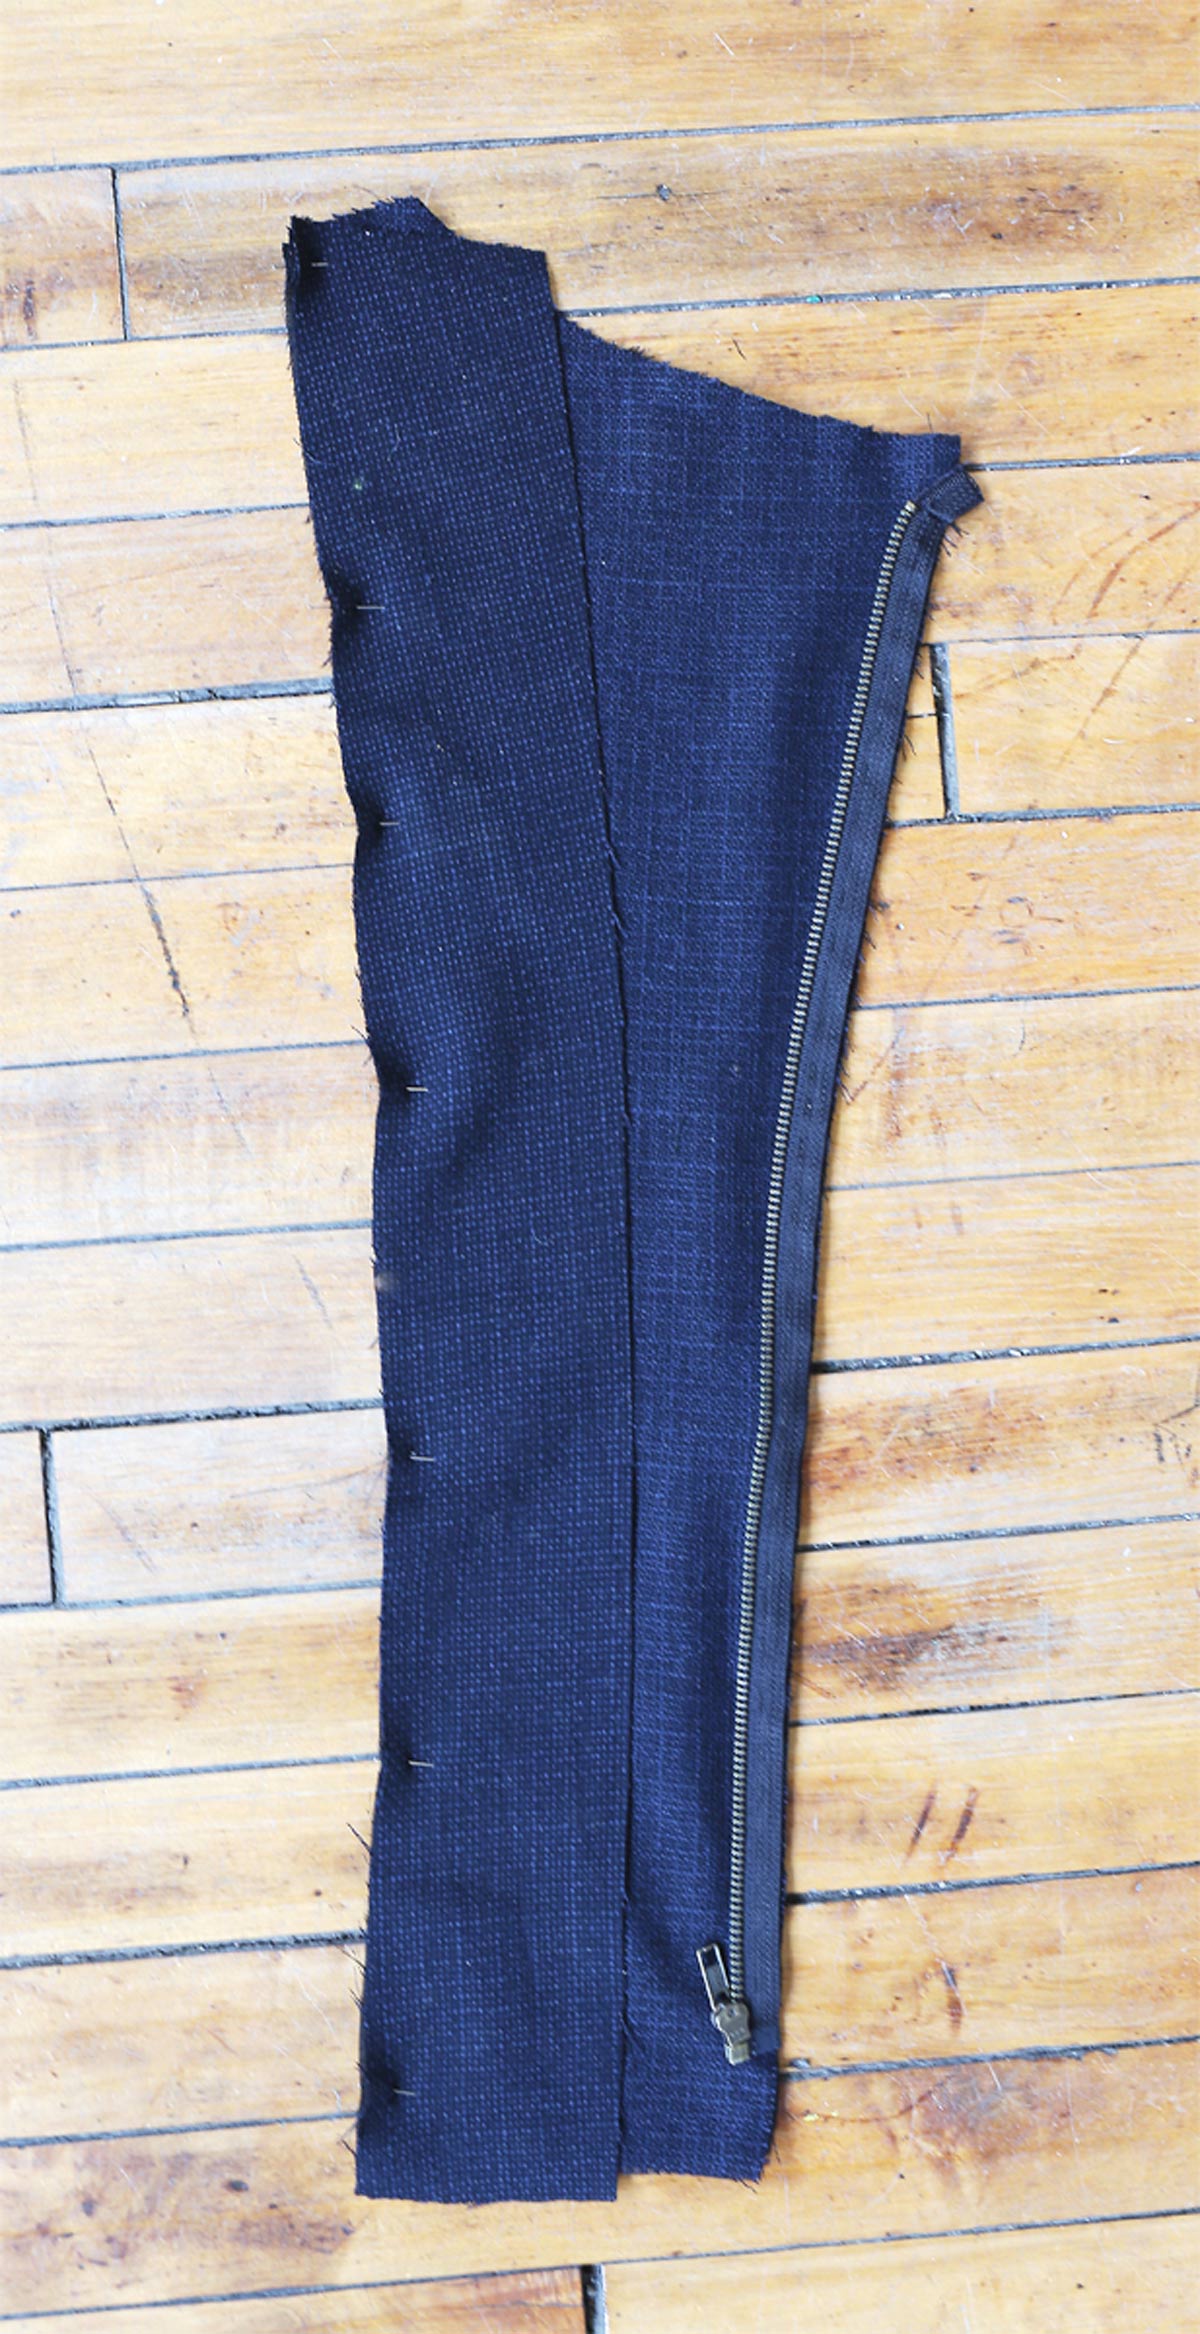
4. Pin right MIDDLE FRONT (2) section to right front, clipping front where necessary. Stitch. Press seam allowances toward middle front. (This pattern includes a lot of opposing curves. If you clip into the seam allowances of the shorter curve, the two pieces will fit together very nicely. This is why you staystitched the fabric in step 2. Now you can clip the seam allowances up to the staystitching safely without worrying about clipping into the jacket fabric.)
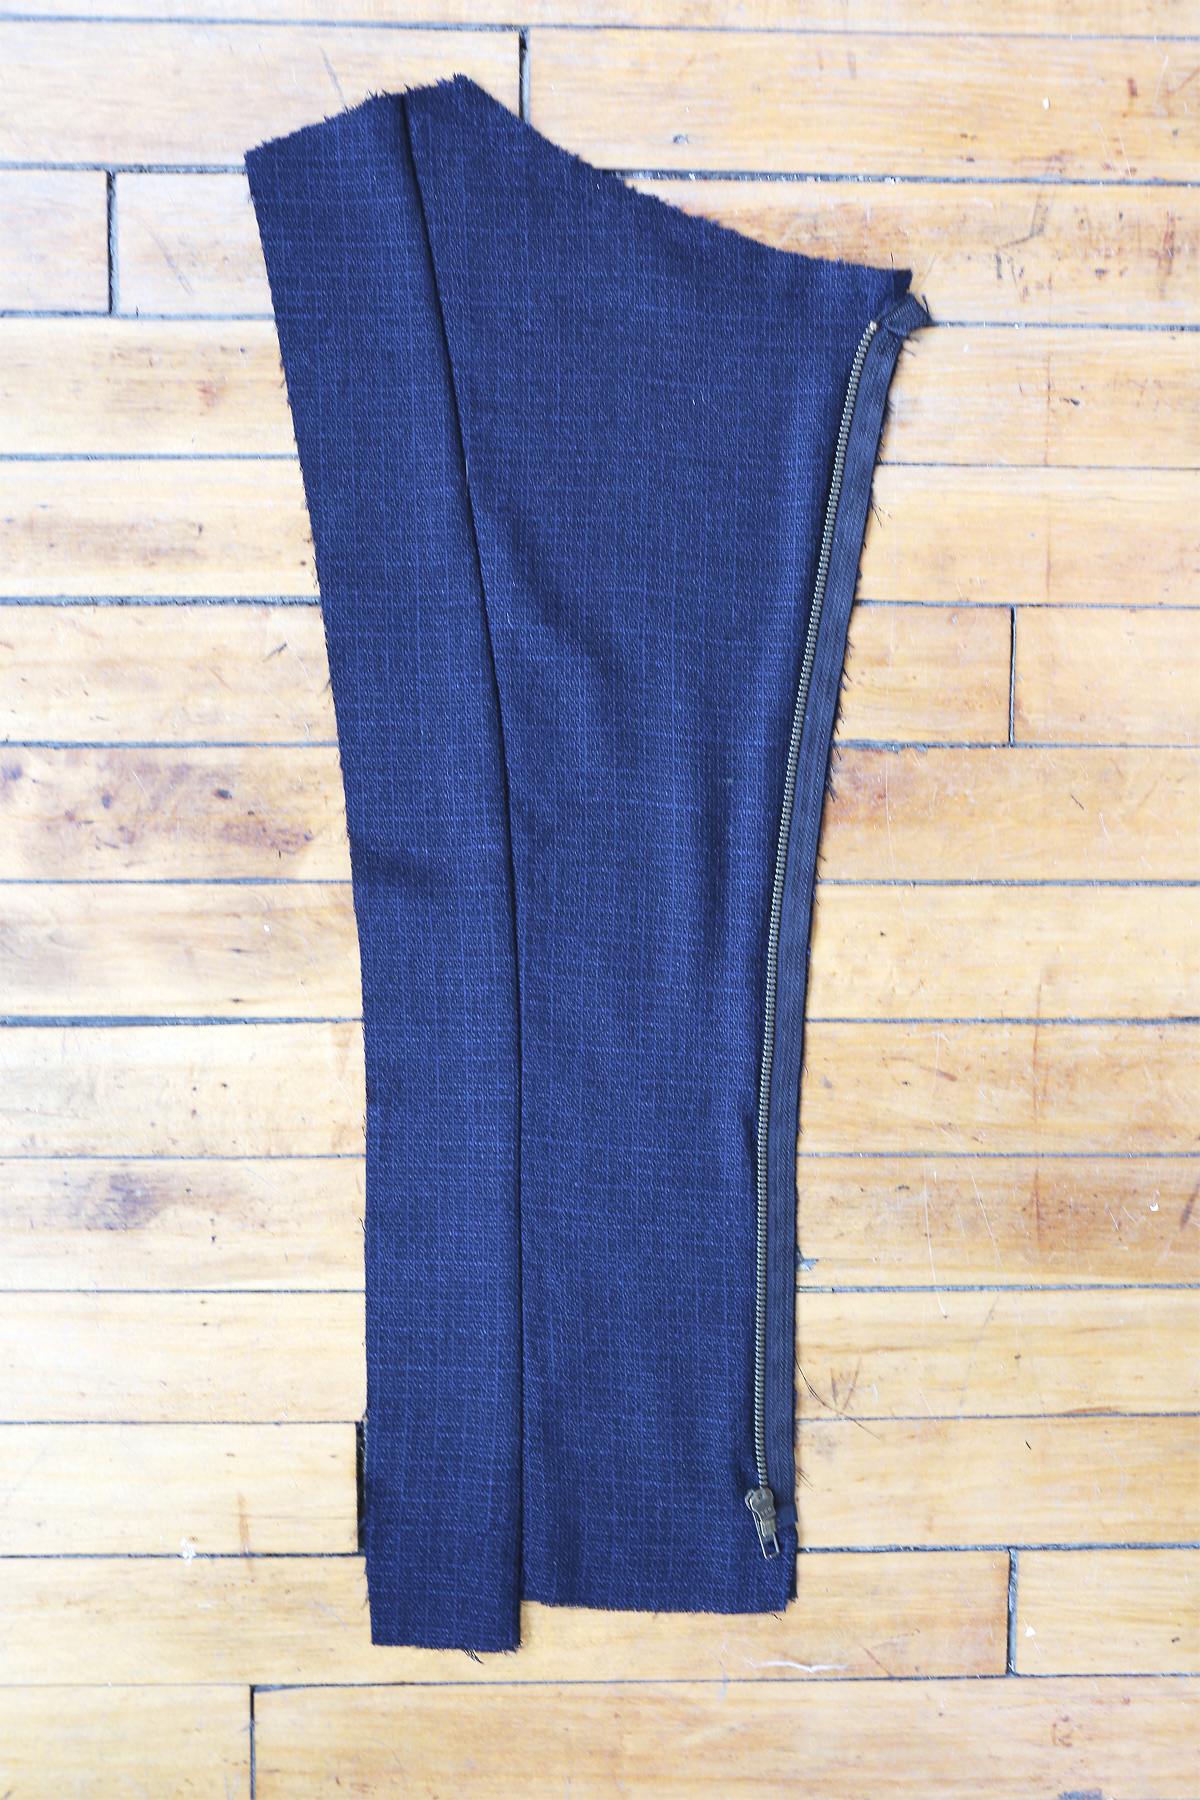
5. Separate zipper. On outside, pin remaining zipper tape (face up–not face down as stated in the instructions) to side edge of left front between large circles, placing zipper stop at lower large circle and zipper teeth just over the 5/8” (1.5cm) seam allowance, tapering upper end of zipper tape to nothing at upper large circle. Baste. (This is just like the first side of the zipper, but be sure you’re attaching the zipper to the correct side of the pattern piece here. It’s not getting basted to the center front edge, but to the inside edges. It will get sandwiched into the seam in the next step.)
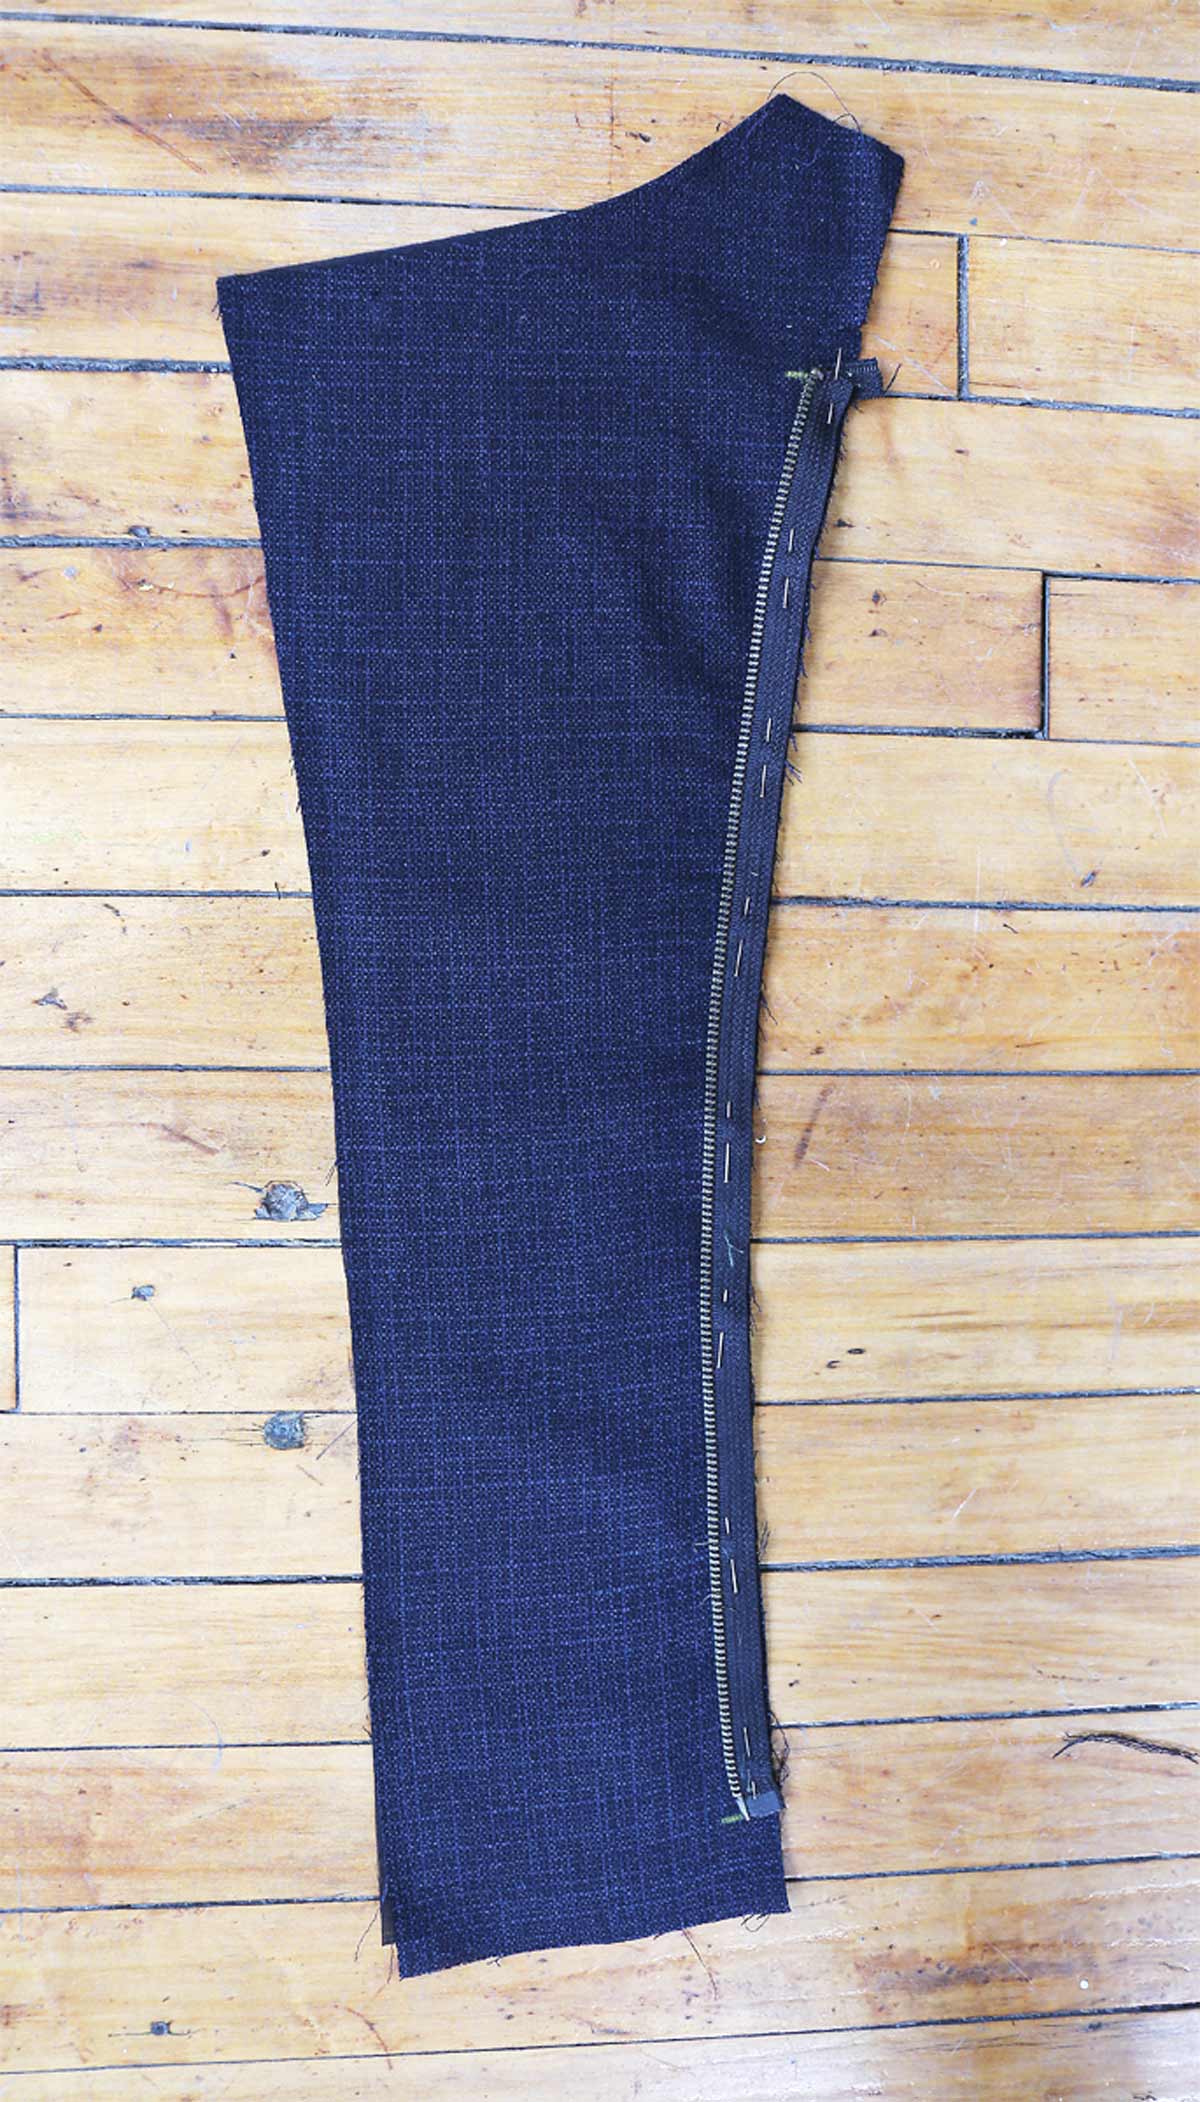
6. Pin left middle front section to left front (over zipper), clipping front where necessary. Stitch, using a zipper foot when stitching. Press seam allowances toward middle front.
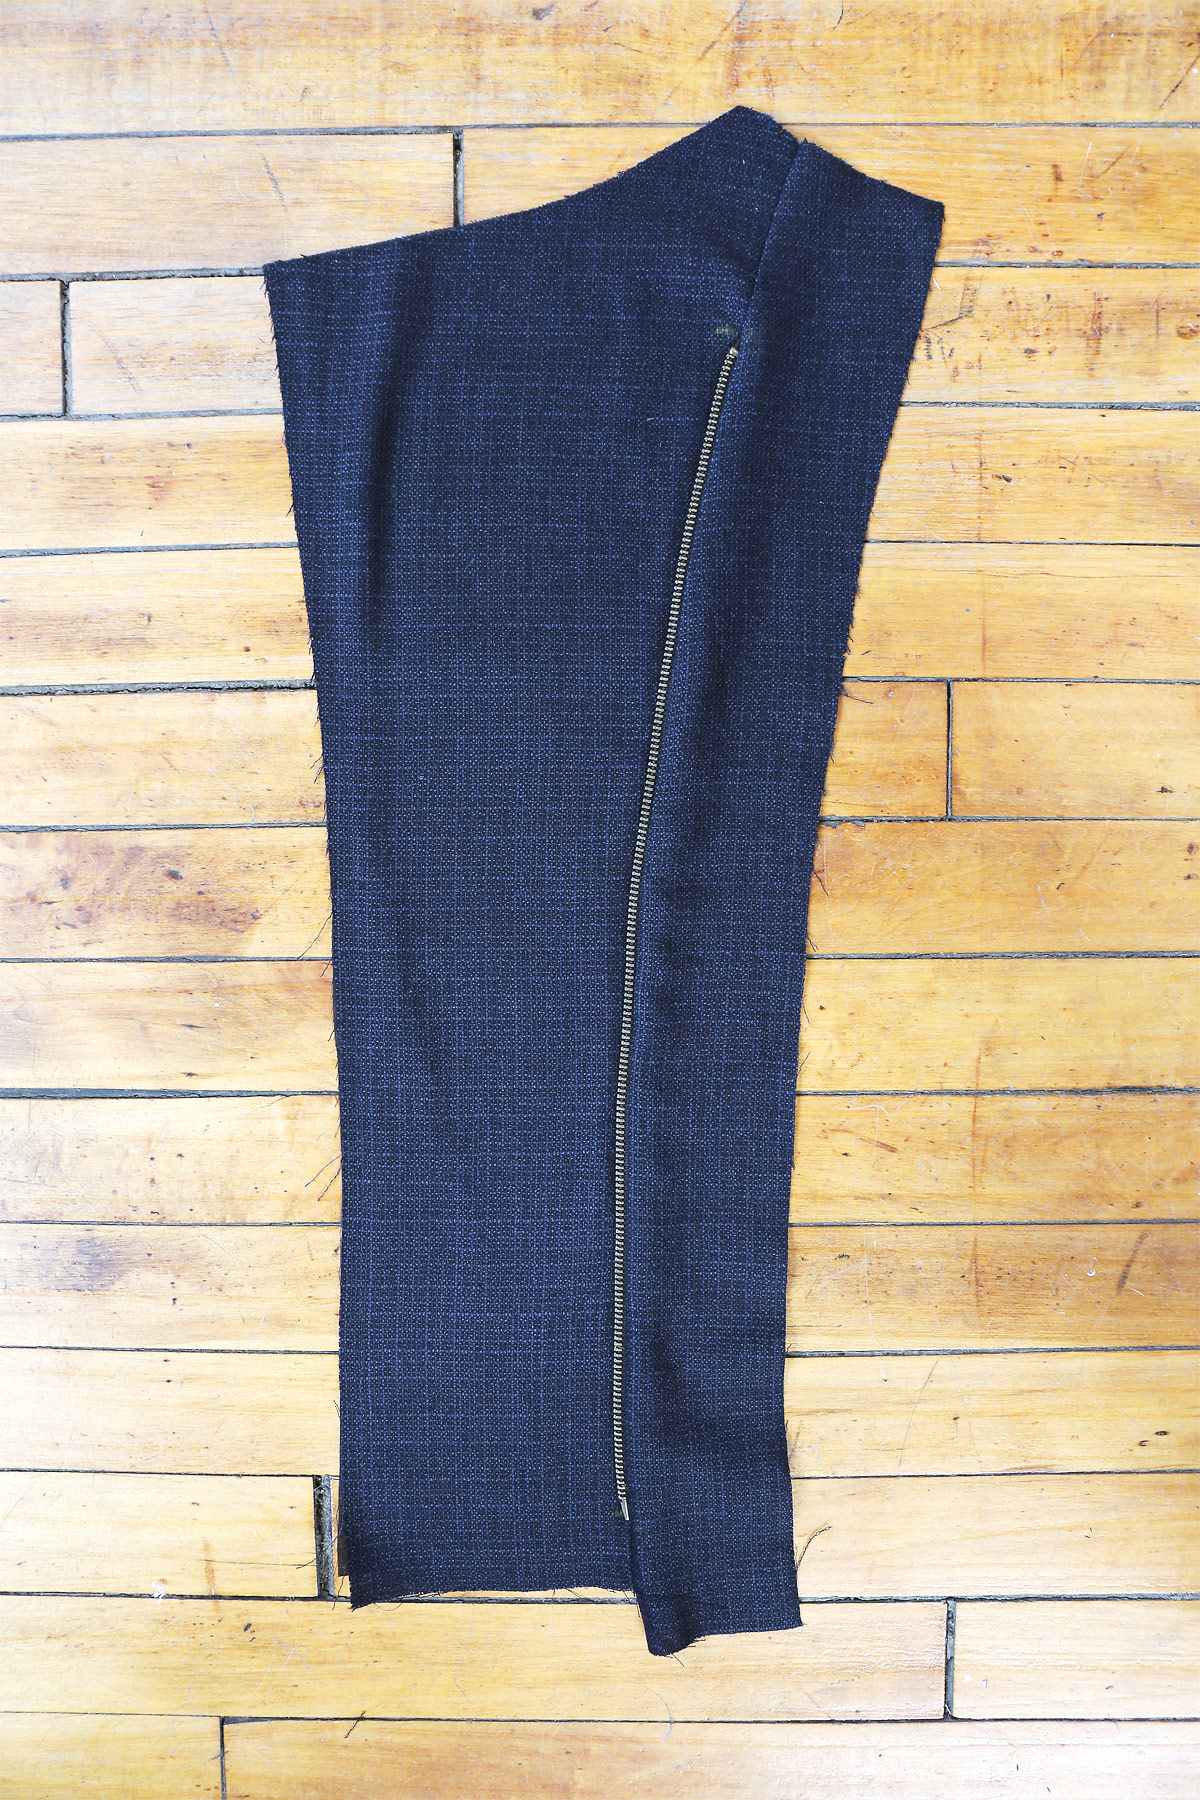
7. STAYSTITCH side edge of each middle front section between upper two notches.
And that’s it for Day 1 of the sew-along! Tomorrow we’ll tackle the pockets and finish assembling the front and back of the jacket.
Continue on to Day 2 of the sew-along.


16 Comments:
Hi Liesl, love this pattern. Just wondered if you thought it would work in leather?
Manju, absolutely! I’m glad you like it. I posted a bunch of styling and inspiration images a few weeks ago, and I’m planning to sew the jacket with some leather panels next. (I don’t I have enough leather for the entire jacket.) I hope you’ll do it and show me how it turns out. How exciting! Here is a link to my inspiration post with lots of leather included: http://www.sewlisette.com/blog/2015/02/fabric-inspiration-lisette-b6169-moto-jacket/
Step 5 – anyone else think the zipper should be face up?
Step 5 may be incorrect: (unless sewing at midnight has addled my brain) I think the zipper should be face up.
Yes, thanks for catching that! In the photo the zipper is right side up, but the instructions state that it should be face down. I also noticed another error at step 14, where the welts should be turned to the side front, not the center front as stated in the instructions. I’ll notify Butterick so they can correct the instructions for future printings.
Hi Liesl, I just received the moto jacket pattern in the mail today and am looking forward to making it after I finish a few other patterns that are in the works now. (I hope the instructions have been updated since your March post). I’m wondering what size the model is wearing in the promo photo that you use above. I vary between a 10 and 12 depending on the fit and want to have a better idea before I start cutting the pattern. It looks like the fabric can be anything from cotton to leather to a heavy knit, which is great. Love the look!
Oops! Forget that comment about updating the pattern instructions since March. My head is all about sewing right now, not dates! So glad I found your updated instructions here then.
Elena, the model was wearing a size 10, which is the Butterick sample size. However, I’m not really sure how much help that information will be since I can’t tell you what the model’s measurements are. A size 10 equates to approximately a size 6 in ready-to-wear. I wear a size 10 as well, but I would recommend making a muslin if you don’t know your pattern size. Please also refer to my post about sizing, which may help: http://www.sewlisette.com/blog/2015/03/finding-your-sewing-pattern-size/
With regard to the corrections to the instructions, they won’t be included in your pattern because we just discovered them yesterday. I will alert Butterick so they can make changes to future printings, but in the meantime the blog post is updated to be correct. And yes, you can use a lot of different fabrics for this pattern. I reviewed a lot of ideas in this post: http://www.sewlisette.com/blog/2015/02/fabric-inspiration-lisette-b6169-moto-jacket/
I hope you’ll enjoy the pattern!
Thanks Liesl, I will follow your pattern updates here on the blog. I find the sizing in stores vs. patterns a bit confusing especially since I’m used to European store sizes now (I live in Switzerland. Italian and French sizes are petite and German sizes are big!). And pattern sizing seems to have drastically changed since I sewed years ago! I tend go to for US size 12 in a pattern because that’s what my measurements indicate but then when I make them they are usually too big. Strange. Anyway, I found your post about sizing and also the fabric inspirations so they will be very helpful and inspiring. I’m looking forward to finding just the right fabric and getting started!
Ah yes, I can absolutely understand the size confusion! American sizes have changed a great deal in the past few decades. If you generally find a pattern size 12 to run a bit large you may want to size down to a 10. The Lisette sizes will be very similar to other Butterick/Vogue/McCalls/Simplicity patterns, so go with whatever you usually make and I think you’ll be close, at least. For the Lisette pattern I do insist on a higher armhole (and narrower sleeve, as a result) because I think the look and fit are so much better, but otherwise the Lisette styles should be similar in fit to other patterns.
I loved the finished look Meg Carter’s jacket on McCall’s blog that I decide to come over and take a peek.
At first I thought am all ready in a sew-a-long. Plus I would have to buy fabric….
Then I remembered, I have black fabric that would work nice………….LOL. Maybe I will take the plunge 🙂
Sheseams, do join us! We’d love to have you.
I really like this pattern and have just purchased it.
I would love to put zippers on the sleeve. What are your thoughts on making that change
I think that’s a great idea! I hope you’ll show us when you’re done!
I love this pattern! I recently found some beautiful orange faux suede that I am thinking of using. I really like the inspiration picture of the orange with grey facing. I love purple and orange together, so I may look for a purple to use as the facing.
I’d love to see it when you’re done Tasha! It sounds like it’s going to be really great.